Although the internet is full of tutorials on getting DS18B20-based 1-wire thermometers running, I think practical experience with multiple sensors and subsequent data processing can still be useful.
DS18B20 chip
Thermometers based on the DS18B20 chip are popular mainly because many thermometers and other 1-wire chips can be connected to a single data wire. In practice, parasitic power can be used, leaving only a data wire and ground, as described in this article on building a 1-wire temperature-sensor network, but I do not consider that wiring very reliable.
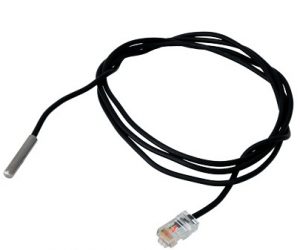
DS18B20 sensor with an RJ45 connector
In my installation I used 1-wire sensors supplied as part of the UniPi platform. They are waterproof thermometers with a cable and a crimped RJ45 connector. They are much more expensive than cheap Chinese sets, but all sensors I have show the same temperature to one tenth of a degree when placed in the same location, which is not guaranteed with manufacturing leftovers. The advantage is that the sensors use four wires (+5V, GND, 2x data), while both data wires, yellow and black, are connected inside the housing:
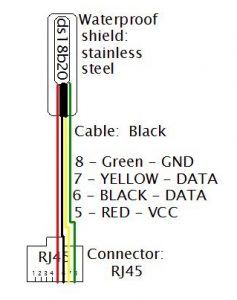
This makes it possible to create a 1-wire ring topology, although physically the wiring looks like a star. When connecting neighbouring sensors, I connect pin 7 to pin 6 of the next sensor. The ring topology is more reliable than a star, where longer wires cause many reflections and the reliability of 1-wire communication drops quickly.
Connecting to Raspberry Pi
Let us assume the sensors are connected to each other. How do we connect everything to a Raspberry Pi? One option is to use a dedicated I2C controller. A more elegant route, and certainly sufficient for thermometers, is to connect 1-wire directly to the GPIO pins of the Raspberry Pi:

Connecting DS18B20 sensors to Raspberry Pi
The sensors are powered from +5V, one end of the logical ring is connected to GPIO pin 4 (the yellow wire from pin 7 of the RJ45 connector), and the other end (the black wire from pin 5) goes through a pull-up resistor to +5V. It is worth choosing the pull-up resistor experimentally so that all sensors are read reliably. In my case, 4k7 was a reasonable value.
Software
At this point we should be able to read the temperatures provided by the individual thermometers. First, Linux on the Raspberry Pi has to be configured. Add this line to /boot/config.txt:
dtoverlay=w1-gpioThen load the kernel modules for 1-wire, either from the console or permanently by adding the following lines to /etc/rc.local; if you do that, you can omit sudo:
sudo modprobe w1-gpio
sudo modprobe w1-therm
Now switch to /sys/bus/w1/devices/, where each 1-wire device has a symlink to a directory with a name like:
28-0000074b914c
28-0000074bcf7a
28-0000074be7b1
28-0000074c293a
28-0000074c6fcd
28-0000074cd977
28-000007c22404
28-000007c2951b
w1_bus_master1
The name of each subdirectory contains the unique identifier burned into every DS18B20. The data can be read from the w1_slave text file inside each directory, for example with this pair of Python functions:
def read_w1_temp(id):
    fn = '/sys/devices/w1_bus_master1/{}/w1_slave'.format(id)
    try:
        with file(fn) as fr:
            data = fr.read()
            return data
    except (OSError, IOError):
        return None

def parse_w1_temp(w1_data):
    w1_data = w1_data.splitlines()
    line0 = w1_data[0].strip()
    if not line0.endswith('YES'):
        return None

    line1 = w1_data[1].strip()
    temp = line1.split('t=')[1]
    temp = float(temp)/1000.
    return temp
The first function reads data for a thermometer ID. The returned data is then processed by the second function, which returns the resulting temperature as a float if the reading is valid.
Conclusion
Building a network of 1-wire thermometers is relatively simple. Several details still matter, especially the ring topology and the use of good sensors.
You can also read my earlier post about a smartly built dumb house.